Robo Sound LabBeta
Give your robot a voice. Record or drop a sound, add a robot effect and get it ready for your ESP32 or DFPlayer Mini. Everything runs in your browser, so your files never leave your computer.
Drop WAV or MP3 Files Here
Export
How do you want to play your sounds?
Files for Your SD Card
WAV, 44.1 kHz, 16 bit, mono. The ZIP contains a folder 01 with numbered files. Copy this folder to your SD card as it is. The numbers follow your list from top to bottom, so download the ZIP again after you change the list.
Add some sounds above and your files show up here.
Custom Example Sketch
Sounds will be converted to a 22 kHz sample rate.
sounds.h (preview)
Add some sounds above and the header file shows up here.
Custom Example Sketch
How To Use It
Download the Files
You need two downloads from above: the ZIP with your SD card files and the example sketch. Unzip the ZIP, you'll need the folder
01in step 3.Wire the DFPlayer Mini
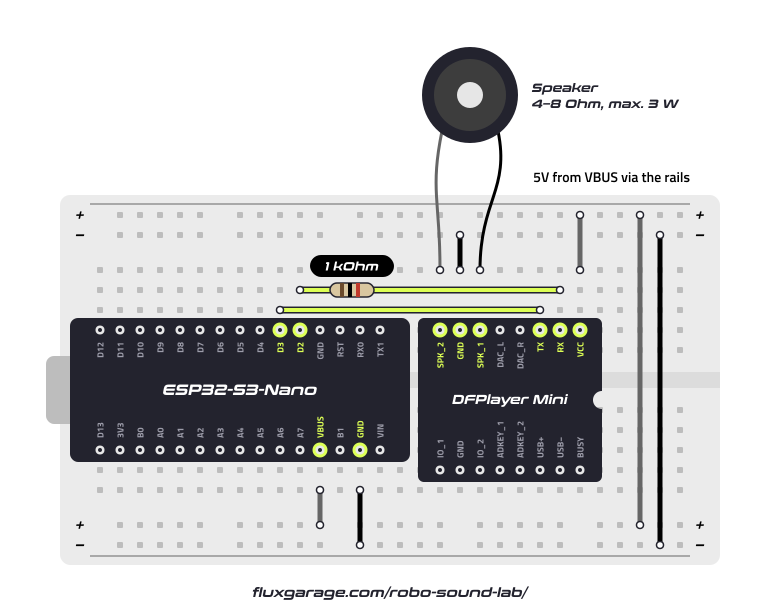
I use an ESP32-S3-Nano here. Connect TX of the DFPlayer to D3 (GPIO 6) and RX through a 1 kΩ resistor to D2 (GPIO 5). The resistor helps against noise from the speaker. VCC goes to 5V (VBUS), GND to GND. The speaker (4 or 8 ohm, up to 3 W) connects to SPK_1 and SPK_2. Any other ESP32 works too, just pick two free pins and change the numbers in the sketch.
Prepare the SD Card
Format a microSD card (up to 32 GB) with FAT32. Copy the folder
01to the top level of the card. Keep the folder and file names as they are: the DFPlayer finds each sound by its folder and file number.Install the Board Package and Library
In the Boards Manager, install esp32 by Espressif Systems, version 3.x or newer. Then open the Library Manager, search for DFRobotDFPlayerMini and install it.
Upload the Sketch
For the ESP32-S3-Nano, select Tools > Board > esp32 > Arduino Nano ESP32 and set Tools > Pin Numbering to By GPIO number (legacy). With another board, set the two pin numbers at the top of the sketch to match your wiring.
Check the Serial Monitor
Open the Serial Monitor at 115200 baud. The sketch tells you what it's doing:
DFPlayer readyandPlaying 01/001.wav. If it saysDFPlayer not found, check that TX and RX are crossed over and that the SD card sits in the slot. On an ESP32-C3, set Tools > USB CDC On Boot to Enabled, otherwise the Serial Monitor stays empty.
Good to Know
- Which DFPlayer? This guide is written for a DFPlayer Mini with the YX5200-24SS chip, the one used on the original module by DFRobot. There are many clones out there with other chips on board, such as TD5580A, MH2024K-24SS, GD3200B or AA19HFF859. They look the same, but some answer the library differently, react slowly or ignore certain commands. If yours stays silent or says
DFPlayer not foundalthough the wiring is right, look at the chip name printed on the module. In the sketch you'll find a line to try for clones. - Slow reaction? If a sound starts about half a second late, the library is waiting for an answer the module never sends. The clone line in the sketch fixes that, too.
- Power. Give the DFPlayer 5V. At full volume it can pull enough current to reset your ESP32 over a weak USB port. Start with a low volume.
- Speaker. Connect the speaker only to SPK_1 and SPK_2, never to GND.
How To Use It
Download the Files
You need two downloads from above: the header file sounds.h and the example sketch. Put both into the same sketch folder, the folder must have the same name as the sketch file.
Wire a MAX98357A Amplifier
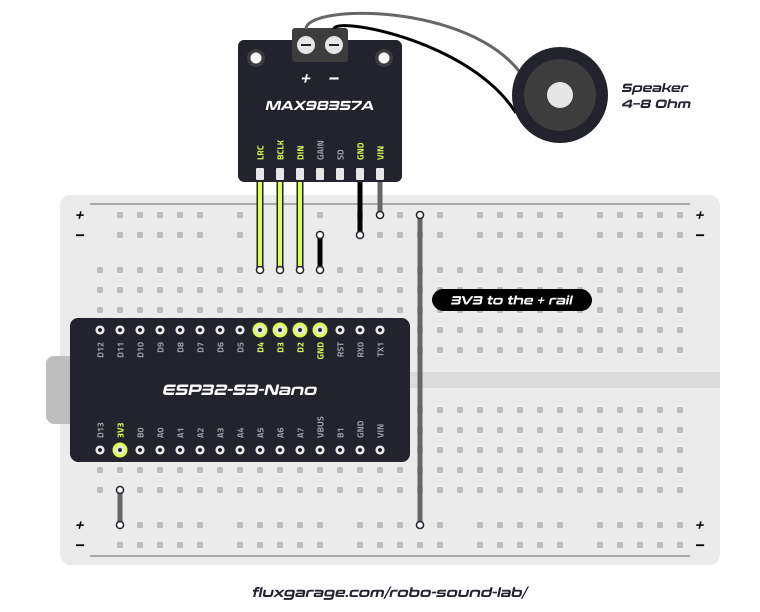
I use an ESP32-S3-Nano here. Connect LRC to D4 (GPIO 7), BCLK to D3 (GPIO 6), DIN to D2 (GPIO 5), GND to GND and VIN to 3V3. GAIN and SD stay unconnected. A small 4 or 8 ohm speaker goes onto the screw terminal. Any other ESP32 works too, just pick three free pins and change the numbers in the sketch.
Install the Board Package and Library
In the Boards Manager, install esp32 by Espressif Systems, version 3.x or newer. Then open the Library Manager, search for ESP8266Audio and install it. Despite the name, it works on the ESP32 as well.
Select Your Board
For the ESP32-S3-Nano, select Tools > Board > esp32 > Arduino Nano ESP32. Take it from the esp32 package, not from "Arduino ESP32 Boards", which is too old for the library. A new menu shows up: set Tools > Pin Numbering to By GPIO number (legacy), so the numbers in the sketch match the GPIO numbers. With another board, set the three pin numbers at the top of the sketch to match your wiring.
Check the Partition Scheme
The flash bar assumes a typical board with 4 MB flash. If your sounds don't fit the default, select Tools > Partition Scheme > Huge APP before you upload. After compiling, the Arduino IDE shows the exact size of your sketch.
Check the Serial Monitor
Open the Serial Monitor at 115200 baud. The sketch tells you what it's doing:
Playing … OKandFinished after … ms. If a sound finishes on time but you hear nothing, check the wiring, especially DIN. On an ESP32-C3, set Tools > USB CDC On Boot to Enabled, otherwise the Serial Monitor stays empty.
Good to Know
- Speaker. Both speaker terminals of the MAX98357A carry the signal. Never connect one of them to GND, this can damage the amplifier.
- Too quiet? Power the amplifier with 5V (VBUS) instead of 3V3, it gets much louder. The GAIN pin also sets the volume: open is 9 dB, to GND is 12 dB, to VIN is 6 dB.
- No sound at all? The SD pin switches the amplifier on. On most boards it does that by itself when left open, on some cheap modules you have to connect SD to VIN.
- Resets at loud sounds? A loud speaker can pull the voltage down far enough to reset your ESP32. Lower the gain in the sketch or use a stronger power supply.
- Stuttering sound? The ESP32 has to call
wav->loop()all the time. Anydelay()or slow code in your loop makes the sound stutter, so keep your code non-blocking. - A click sound at the start of each sound is normal: the amplifier switches on. It's not a bug in your file.